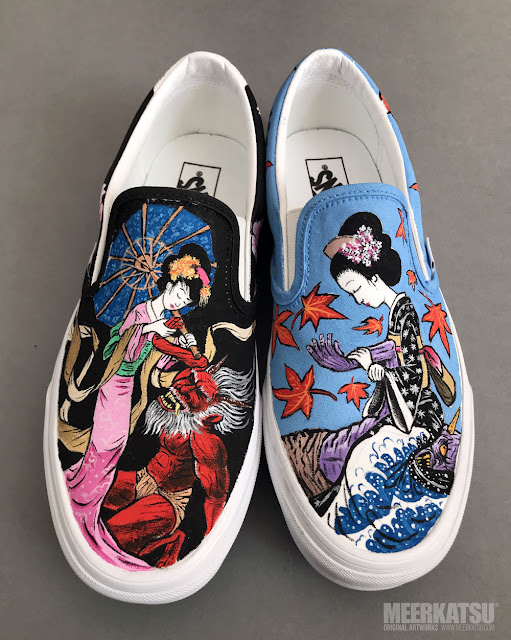
The current lockdown situation has given me time to embark on several art projects that I have long been thinking about.
These painted Vans were put together over 5-6 days and are based on my previous Meerkatsu rashguard designs - the Heavenly Wristlock and the Graceful Kimura.
Here's a more detailed rundown of how I painted these shoes:
1. Formatting the artwork.
I chose my Graceful Kimura design and Heavenly Wristlock design as good pieces to re-draw onto my shoes. I needed to make sure the core line art would fit onto the shoes so I used a plain photo of Vans Classic slip-on shoes and made a rough mock-up. There is also this handy template.
I wasn't happy with the way the artwork was composed so I switched around the positions and changed some of the details from the original (eg arm positions).
I chose Vans because their slip-on model offered the easiest and largest plain white surface to paint on. Other models that are popular with custom shoe artists include Converse Chuck Taylors. In fact if you search online, you will encounter a huge community of custom shoe artists.
2. Materials
This photo below shows the art materials I used:
(a) Thin paper - I used this to print out the artwork and then rubbed an 8B pencil onto the reverse side. I wanted the artwork to look as precise as possible on the shoe, re-drawing over the line art would ensure the 8B pencil would mark the canvas material.
(b) Fabric paints - Tulip and Pebeo Setacolor are two popular brands. Fabric paints are designed to be used sttraight into un-primed textile surfaces and when dry will not crack, peel or wash off. The opaque paints can be used even onto dark coloured fabrics.
(c) Liquitex soft body acrylic colours and Liquitex Fabric Medium - these two combined will ensure the colour can be painted onto fabric and will not crack when dry.
(d) Masking tape - I didn't want paint to accidentally go onto the rubber edge of the sole. I needed to use very short strips so that the tape could fit around the curve of the foot.
(e) Soft pencils - an 8B for the rubbing, 2B to draw more solid lines onto the shoe surface
(f) Paint brushes - suitable for acrylic painting, I used a mixed variety of round and flat edged brushes. The best one was a size 0 round brush for those really tiny details eg flower decorations and hair details.
3. Shoe preparation
On some YouTube tutorials I noticed that some shoe artists would prime the surface with gesso paint, or a mix of white+fabric medium. I didn't do this step as I was using fabric paint which didn't need a primed surface.
I stuffed the interior of the shoe with crumpled up old paper from magazines and newspapers to ensure a hard surface on the upper part of the shoe.
After rubbing the graphite onto the shoe, I traced over the lines again to ensure perfect clarity of the design and to make last minute composition corrections.
I also made a test strip of the colours I would use (for the Kimura artwork).
4. Painting the shoes - Graceful Kimura
(a) I traced over the graphite rubbing with a 2B pencil:
(b) Next I painted the background sky:
(c) Then I filled in the remainder of the artwork:
(d) The next stage was adding black line art over the base colours (see video):
(e) The final stage was to add some highlights and kimono decorations, this is where the metallic shimmer paints came in useful:
5. Painting the shoes - Heavenly wristlock
(a) pencil lines:

(b) background painted in:
(c) colours filled in:
(d) black line art:
(e) Finished shoe:
6. Sealing and protecting the shoes
UPDATE (12/4/2021) I used acrylic medium to seal the artwork. If I wanted to make it even further waterproof then some shoe protector spray on top would be perfectly fine, but I have not done this so far. Check out my Youtube video here to see how water repellent the shoe is.
7. Problems
There were a few issues I encountered when painting these. The main one is the awkwardness of trying to squeeze a design intended for rashguard use onto the smaller, curved shape of a shoe. Even editing using the shoe template wasn't good enough to get a perfect fit so I had to invent some lines while painting on the show eg the kimono trail and the demon's hair.
The Setacolor opaque paint dries to quite a thick and has an almost crusty texture. It also shrinks a little when dry so I noticed some white unpainted areas which I had to cover up later.
My eyesight is getting really bad, I need reading glasses - so painting extremely tiny details was difficult.
UPDATE (12/4/2021) - I have since got new reading glasses and it makes near-sight work so much easier!
8. Video
Here is a video showing little clips of the painting process. Hope you like them. I've got a few more shoe designs planned in the weeks ahead.
As I had hoped, these painted shoes are getting lots of positive comments on social media - Reddit BJJ, Reddit Streetwear, Instagram, Facebook.
.
8. Video
Here is a video showing little clips of the painting process. Hope you like them. I've got a few more shoe designs planned in the weeks ahead.
As I had hoped, these painted shoes are getting lots of positive comments on social media - Reddit BJJ, Reddit Streetwear, Instagram, Facebook.
.


No comments:
Post a Comment